There are few culinary experiences as universally comforting and satisfying as a hearty pot roast, especially when the crisp air of autumn or the chill of winter calls for something truly warming. While many methods exist for this classic dish, preparing a dutch oven pot roast stands in a league of its own, transforming humble ingredients into a melt-in-your-mouth masterpiece of rich flavor and seared perfection. It's a culinary ritual that promises not just a meal, but an experience – a fragrant kitchen, a bubbling pot, and a table surrounded by loved ones.
This isn't just any roast; it's a dish steeped in tradition, designed for ease, and bursting with layers of flavor. From the initial sizzle of searing to the long, slow braise, every step contributes to an unparalleled depth that a conventional slow cooker simply can't match. And the best part? It often tastes even better the next day, making it an ideal make-ahead meal for busy weeknights or special gatherings.
Why a Dutch Oven Pot Roast is Unbeatable for Flavor and Tenderness
The Dutch oven is more than just a pot; it's a culinary workhorse perfectly suited for creating the ultimate pot roast. Its heavy cast-iron construction, often enameled, offers several distinct advantages that elevate a simple roast to an extraordinary meal:
- Superior Searing Capability: Unlike most slow cookers, a Dutch oven can be heated to a high temperature on the stovetop, allowing you to sear your chuck roast to a deep, golden brown. This crucial step, known as the Maillard reaction, caramelizes the meat's surface, locking in juices and developing incredible savory notes that form the foundation of your pot roast's rich flavor profile. To understand more about this vital step, explore why searing makes all the difference in a Dutch Oven vs. Slow Cooker comparison.
- Even Heat Distribution: Cast iron excels at retaining and distributing heat uniformly. This means your pot roast cooks gently and consistently, preventing hot spots and ensuring every part of the meat and vegetables braises perfectly, resulting in consistent tenderness.
- Moisture Retention: The heavy, tight-fitting lid of a Dutch oven traps steam and moisture within the pot, creating a self-basting environment. This prevents the roast from drying out, ensuring that the beef remains incredibly juicy and tender as it slowly breaks down.
- True One-Pot Wonder: From searing on the stovetop to braising in the oven, and even reducing the sauce afterward, everything happens in one vessel. This significantly reduces cleanup, making the cooking process as enjoyable as the eating.
- Deep, Developed Flavors: The low-and-slow braising process in a Dutch oven allows all the aromatic ingredients—garlic, herbs, tangy balsamic vinegar, and savory Worcestershire—to meld and deepen over hours, creating a complex and incredibly satisfying sauce that coats every forkful.
Crafting the Perfect Pot Roast: Ingredients & Substitutions
The beauty of a dutch oven pot roast lies in its simplicity and the quality of its components. While the core ingredients are straightforward, understanding their roles and potential substitutions can help you tailor the dish to your pantry and palate.
The Star: Beef Cut
For a truly fall-apart tender pot roast, the choice of beef is paramount.
- Chuck Roast (2-2 ½ pounds): This cut, from the shoulder of the cow, is ideal. It's well-marbled with fat and connective tissue, which, when slow-cooked, breaks down into gelatin, creating an incredibly rich, moist, and tender texture.
- Substitutions: Brisket or bottom round can also work. Brisket will be similarly rich, while bottom round is leaner and benefits from a longer, slower cook to achieve optimal tenderness.
Aromatic Vegetables
Vegetables not only add flavor and nutrition but also help create a delicious bed for the meat to braise on.
- Core Mix: Baby carrots, baby potatoes, mushrooms (white or cremini), onion, and garlic. These contribute sweetness, earthiness, and essential aromatics.
- Potato Debate: Some prefer to add potatoes later in the cooking process, or even cook them separately, to prevent them from becoming too soft. If you love very tender, melt-into-the-sauce potatoes, add them from the start. For firmer potatoes, consider adding them during the last hour of cooking, or roasting them alongside in a separate dish.
- Substitutions: Regular chopped carrots, Yukon gold or red potatoes (cut into 1.5-inch pieces), shallots for onions, and a variety of mushroom types are all excellent choices.
The Flavor Foundation: Seasonings & Liquid
This is where the magic truly happens, building layers of savory, tangy, and slightly sweet notes.
- Seasoning Rub: A blend of garlic powder, onion powder, mustard powder (for a subtle tang and emulsification), paprika (for color and mild pepperiness), salt, and black pepper. A pre-made steak seasoning blend can also work in a pinch.
- Liquid Mixture:
- Beef Broth: The primary liquid, adding rich beefy flavor. Chicken or vegetable broth can be used for a lighter base.
- Balsamic Vinegar: Crucial for acidity, which brightens the dish and helps tenderize the meat. Apple cider vinegar is a good alternative.
- Brown Sugar: Balances the acidity and adds a hint of sweetness, contributing to the rich caramelization. Honey or maple syrup can substitute.
- Worcestershire Sauce: A powerful umami booster, adding depth and complexity.
- Dijon Mustard: Adds a sharp, tangy kick and helps emulsify the sauce. Yellow mustard is a viable substitute.
Herbal Enhancements & Thickeners
These elements provide aromatic depth and the perfect consistency for your sauce.
- Fresh Herbs: Rosemary, thyme, and bay leaves are classic choices, imparting a fragrant, earthy aroma. If using dried, remember the general conversion: 1 teaspoon dried per 1 tablespoon fresh.
- Thickeners: Cornstarch (or arrowroot) is used to create a luscious, perfectly thickened gravy that clings to the meat and vegetables.
- Olive Oil: Essential for achieving that perfect sear on your roast. Any neutral cooking oil will suffice.
Mastering the Technique: Step-by-Step to Fall-Apart Tenderness
Creating an unforgettable dutch oven pot roast involves a few key steps, each contributing to the final glorious outcome.
Searing for Flavor Depth
This is arguably the most critical step for building maximum flavor. Begin by patting your chuck roast thoroughly dry with paper towels; moisture prevents proper browning. Season generously on all sides with your spice blend. Heat a few tablespoons of olive oil in your Dutch oven over medium-high heat until shimmering. Carefully place the seasoned roast in the hot oil and sear on all sides until a deep, crusty brown develops. This Maillard reaction locks in juices and creates a complex, savory base that will infuse the entire dish. Remove the seared roast and set aside.
Assembling Your One-Pot Wonder
Reduce the heat slightly if needed, then add your chopped onions and garlic to the Dutch oven, scraping up any browned bits from the bottom – this is flavorful fond! Sauté until fragrant. Then, return the seared roast to the pot and arrange your other vegetables (carrots, potatoes, mushrooms) around the meat. In a separate bowl, whisk together your beef broth, balsamic vinegar, brown sugar, Worcestershire sauce, Dijon mustard, and cornstarch until smooth. Pour this rich liquid mixture over the meat and vegetables. Finally, tuck in fresh sprigs of rosemary and thyme, and a bay leaf or two.
For more detailed guidance and to see the recipe in action, refer to our comprehensive guide on the Ultimate Dutch Oven Pot Roast: Fall-Apart Tender & One-Pot Easy.
The Slow Braise: Time and Temperature
Cover your Dutch oven tightly and transfer it to a preheated oven. Start with a higher temperature of 325°F (160°C) for the first hour to ensure the pot comes up to temperature quickly and maintains a good simmer, then reduce the heat to 300°F (150°C) and continue cooking for an additional 1.5 to 2 hours, or until the meat is fork-tender. The exact cooking time will vary depending on the size and thickness of your roast. The goal is to cook it "low and slow" to allow the connective tissues in the chuck roast to break down completely, yielding that coveted fall-apart texture.
The Crucial Resting Period
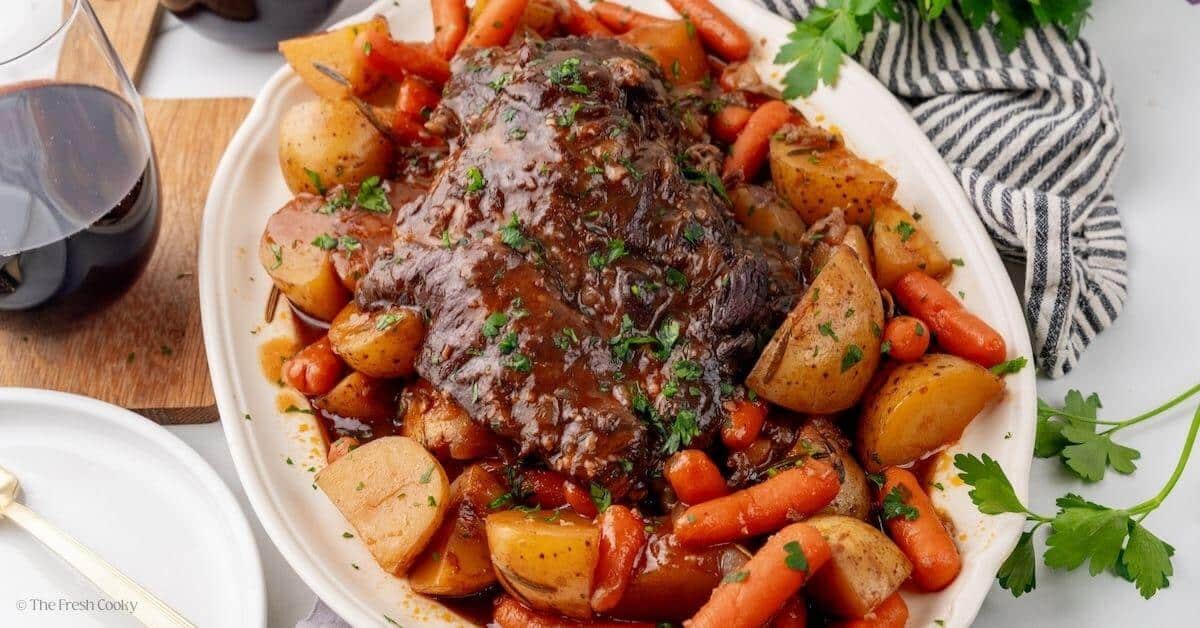
Once your pot roast is cooked to perfection, remove the Dutch oven from the oven and, without peeking, let it rest, still covered, for at least 15 minutes. This resting period is vital: it allows the juices within the meat to redistribute, ensuring every bite is moist and flavorful. After resting, remove the herb stems and bay leaves. The beef should be so tender you can easily shred it with two forks. Serve the shredded beef with the perfectly cooked vegetables and the rich, thickened sauce spooned generously over everything.
Tips for the Ultimate Dutch Oven Pot Roast Experience
- Make-Ahead Magic: A dutch oven pot roast truly improves with time. The flavors deepen and meld overnight, making it an excellent dish to prepare a day in advance for maximum taste. Simply reheat gently on the stovetop or in the oven.
- Serving Suggestions: While delicious on its own, consider serving your pot roast with creamy mashed potatoes (if not cooked in the pot), crusty bread for soaking up the sauce, or even a fresh green salad to cut through the richness. Leftovers are fantastic for sandwiches, tacos, or even a quick shepherd's pie.
- Customization is Key: Don't be afraid to experiment! Add a splash of red wine to the braising liquid for extra depth, include root vegetables like parsnips or celery root, or try different herb combinations. A pinch of red pepper flakes can also add a subtle warmth.
- Troubleshooting Tenderness: If, after the recommended cooking time, your roast isn't fall-apart tender, simply cover it again and continue cooking for another 30-60 minutes, checking periodically. Undercooked chuck roast will be tough; patience is rewarded with tenderness.
- Sauce Consistency: If your sauce is too thin, you can remove the meat and veggies and simmer the liquid on the stovetop to reduce it further. If it's too thick, add a little more beef broth until desired consistency is reached.
A dutch oven pot roast is more than just a meal; it's a culinary hug, a testament to the beauty of slow cooking, and a centerpiece that brings warmth and comfort to any home. Its rich flavors, deeply seared exterior, and effortless make-ahead nature make it a perfect choice for any occasion, promising a deeply satisfying experience with every tender bite. Embrace the magic of the Dutch oven, and prepare to create a family favorite that will be cherished for years to come.
